laravel + livewire + tailwind で chat
最も簡単な chat を作ってみます。
laravel は難しくて細かく書いているとわけがわからなくなります。どこかで一度まとめる必要があります。
プロジェクト作成
composer create-project --prefer-dist laravel/laravel larachatlivewire を設定します。
cd larachatcomposer require livewire/livewiretailwind を設定します。
npm install -D tailwindcss postcss autoprefixernpx tailwindcss init -pデータベースを sqlite にします。
nano .envで設定します。
DB_CONNECTION=sqliteDB_DATABASE=/home/moheno/larachat/database/conf.sqlite例によって、moheno はユーザー名です。
データベースを作成します。
touch database/conf.sqlitemigration によるテーブル作成
今回、作成するテーブルは 1 つ、items です。
php artisan make:migration create_items_tableマイグレーションファイルを編集します。
<?php
use Illuminate\Database\Migrations\Migration;use Illuminate\Database\Schema\Blueprint;use Illuminate\Support\Facades\Schema;
class CreateItemsTable extends Migration{    public function up()    {        Schema::create('items', function (Blueprint $table) {            $table->id();            $table->string('name');            $table->string('comment');            $table->timestamps();        });    }
    public function down()    {        Schema::dropIfExists('items');    }}
マイグレーションを実行します。
php artisan migrateモデルの作成
php artisan make:model Itemモデルの編集
<?php
namespace App\Models;use Illuminate\Database\Eloquent\Model;
class Item extends Model{    protected $fillable = ['name','comment'];}
Livewire コンポーネント
php artisan make:livewire ItemCreate編集
<?php
namespace App\Livewire;
use Livewire\Component;use App\Models\Item;
class ItemCreate extends Component{    public $name;    public $comment;
    public function render()    {        return view('livewire.item-create')->layout('livewire.base');    }
    public function saveItem()    {        $this->validate([            'name' => 'required',            'comment' => 'required',        ]);
        Item::create([            'name' => $this->name,            'comment' => $this->comment,        ]);
        $this->reset('name');        $this->reset('comment');    }}
ItemList 作成。
php artisan make:livewire ItemList編集
<?php
namespace App\Livewire;
use Livewire\Component;use App\Models\Item;
class ItemList extends Component{    public $items;
    public function mount()    {        $this->items = Item::all();    }
    public function render()    {        return view('livewire.item-list', ['items' => $this->items])->layout('livewire.base');    }}
View 設定
resources/views/livewire/item-create.blade.php 編集。
<div>    <h1 class="text-2xl bg-blue-50 border border-stone-400 p-5 py-3 m-3">投稿フォーム</h1>
    <div class="mx-10 leading-10">        <form wire:submit.prevent="saveItem" class="space-y-4">            <div class="flex items-center">                <span class="inline-block w-24 bg-blue-900 text-white text-center rounded">氏 名</span>                <input type="text" wire:model="name" class="ml-3 flex-1 border border-gray-400 rounded">            </div>            @error('name') <span>{{ $message }}</span> @enderror
            <div class="flex items-start">                <span class="inline-block w-24 bg-blue-900 text-white text-center rounded">コメント</span>                <textarea wire:model="comment" rows="2" class="ml-3 flex-1 w-1/2 text-gray-900 border border-gray-400 rounded leading-normal"></textarea>            </div>            @error('comment') <span>{{ $message }}</span> @enderror
            <div class="text-center">                <button type="submit" class="mt-4 bg-blue-500 text-white font-bold py-1 px-4 rounded">投稿する</button>            </div>        </form>    </div>
    <div>        <a href="/" class="inline-block bg-cyan-900 text-white text-center m-10 p-2 rounded">            <span>トップページへ</span>        </a>    </div>
</div>
resources/views/livewire/item-list.blade.php 編集。
<div>    <h1 class="text-2xl bg-blue-50 border border-stone-400 p-5 py-3 m-3">投稿データ一覧</h1>
    <table class="table-auto border-collapse border border-gray-300 mx-10 px-5">        <thead>            <tr>                <th class="border border-gray-300 px-4 py-2 bg-blue-900 text-white">Name</th>                <th class="border border-gray-300 px-4 py-2 bg-blue-900 text-white">Comment</th>            </tr>        </thead>        <tbody>            @foreach ($items as $item)                <tr>                    <td class="border border-gray-300 px-4 py-2">{{ $item->name }}</td>                    <td class="border border-gray-300 px-4 py-2">{{ $item->comment }}</td>                </tr>            @endforeach        </tbody>    </table>
    <div>        <a href="/" class="inline-block bg-cyan-900 text-white text-center m-10 p-2 rounded">            <span>トップページへ</span>        </a>    </div>
</div>
resources/views/livewire/base.blade.php 新規作成。
<!DOCTYPE html><html lang="ja"><head> <meta charset="UTF-8"> <meta name="viewport" content="width=device-width, initial-scale=1.0"> @vite('resources/css/app.css') <title>laravel</title></head><body> {{ $slot }}</body></html>resources/views/welcome.blade.php 編集。
<!DOCTYPE html><html lang="ja"><head>    <meta charset="UTF-8">    <meta name="viewport" content="width=device-width, initial-scale=1.0">    @vite('resources/css/app.css')    <title>Top Page</title></head><body>    <h1 class="text-2xl bg-blue-50 border border-stone-400 px-5 py-2 m-3">Laravel による chat</h1>
    <ul class="list-disc leading-10 mx-10 px-5">        <li class="text-blue-800 hover:text-orange-800 delay-150"><a href="{{ route('item.create') }}">投稿する</a></li>        <li class="text-blue-800 hover:text-orange-800 delay-150"><a href="{{ route('items.list') }}">データリスト</a></li>    </ul></body></html>
ルーティング
<?php
use App\Livewire\ItemList;use App\Livewire\ItemCreate;use Illuminate\Support\Facades\Route;
Route::get('/', function () {    return view('welcome');})->name('home');
Route::get('/item-create', ItemCreate::class)->name('item.create');Route::get('/items-list', ItemList::class)->name('items.list');
tailwind をビルド
tailwind を変更したらそれを反映させるためにはビルドする必要があります。
npm run buildサーバーを立ち上げる。
laravel サーバーを立ち上げて、
php artisan serveアドレスバーから http://localhost:8000 にアクセスします。
何がポイント?
慣れないといつまでも憶えらないのですが、それでは同じことの繰り返しです。
今回、あれやこれや作ってみてわかったことを覚書として記録しておきます。
全体的なイメージ
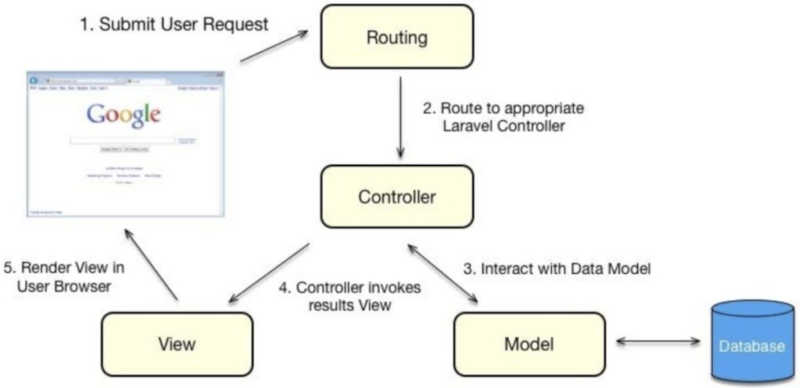
以前 laravel を始めた頃に全体像がチンプンカンプンでした。その時、ある画像を見て少しだけ全体像を把握できました。 あるサイトにあったものです。

ここでのコントローラが livewire コンポーネントなんだろうと思います。
モデルはデータベースと接続する装置のようなものと思いますが、chatGPT によるともっと深い役割があるようです。
livewire コンポーネントは app/Livewire 内に作成される
私の環境では livewire コンポーネントは app/Livewire 内に作成されます。
chatGPT にコードを作ってもらうと「app/Http/Livewire」内に作成されるようなコードを作ってくれますが、それだとエラーになります。
base.blade.php
laravel の blade はそのベースとなる blade を使いまわしてその中に各々の blade を埋め込みます。この方が効率的だと思います。
その blde は何も設定しなければ、「resources/views/components/layouts/app.blade.php」をデフォルトでは参照するようです。 でも混乱するので、「resources/views/livewire/base.blade.php」として設定した方が楽だと考えました。
例えば、以下のような base.blade.php があるとすると、
<!DOCTYPE html><html lang="ja"><head> <meta charset="UTF-8"> <meta name="viewport" content="width=device-width, initial-scale=1.0"> @vite('resources/css/app.css') <title>laravel</title></head><body> {{ $slot }}</body></html>この「{{ $slot }}」の中に以下のような「item-list.blade.php」を埋め込みます。
<div>    <h1 class="text-2xl bg-blue-50 border border-stone-400 p-5 py-3 m-3">投稿データ一覧</h1>
    <table class="table-auto border-collapse border border-gray-300 mx-10 px-5">        <thead>            <tr>                <th class="border border-gray-300 px-4 py-2 bg-blue-900 text-white">Name</th>                <th class="border border-gray-300 px-4 py-2 bg-blue-900 text-white">Comment</th>            </tr>        </thead>        <tbody>            @foreach ($items as $item)                <tr>                    <td class="border border-gray-300 px-4 py-2">{{ $item->name }}</td>                    <td class="border border-gray-300 px-4 py-2">{{ $item->comment }}</td>                </tr>            @endforeach        </tbody>    </table>
    <div>        <a href="/" class="inline-block bg-cyan-900 text-white text-center m-10 p-2 rounded">            <span>トップページへ</span>        </a>    </div>
</div>
その結果、2 つを統合した html が作成されます。
どこに埋め込むのかを「resources/views/livewire/item-list.blade.php」に書くのではなくて、「app/Livewire/ItemList.php」の中に書くのです。
これがとてもややこしい。
public function render() { return view('livewire.item-list', ['items' => $this->items])->layout('livewire.base'); }resources/views/components/layouts/app.blade.php の方がいい
最初は混乱する感じがして「resources/views/components/layouts/app.blade.php」を作成しなかったのですが、 そうすると livewire コンポーネントを作成する度にいちいち base.blade.php を指定しなければなりません。 それはとても面倒なのでデフォルトで設定されている「resources/views/components/layouts/app.blade.php」を作成した方が簡単だと思います。
tailwind は npm run しないと反映されない
tailwind は npm run dev としてサーバー起動しておくか、npm run build でビルドしないと反映されません。